
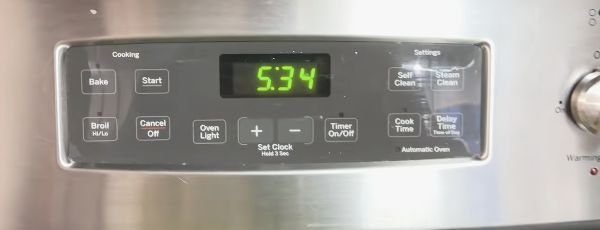
Want your oven dish to finish alongside the rest of dinner? In my video, I use GE oven Delay Start and Cook Time to coordinate broccoli with a meal in my Instant Pot. Delay Start schedules when the oven begins heating; Cook Time sets how long it runs before turning off on models that support timed cooking.
This is a walkthrough of the controls on my GE oven, rather than instructions for every GE range or wall oven. Button names and the order of the steps can vary. Check your model’s owner’s manual before programming a delayed bake.
Quick answer: Check the oven clock, set the delayed start time, select Bake and the temperature, then set Cook Time and confirm the program. On my oven, the display returns to the scheduled start time when the settings are ready. Delay Start alone does not automatically turn the oven off.
Jump to: Video · Control differences · Steps · Holiday meals · Troubleshooting
Watch my GE oven tutorial
Watch the GE oven Delay Start and Cook Time tutorial on YouTube
Delay Start vs. Cook Time vs. the kitchen timer
Delay Start tells the oven when to begin heating. GE also uses names such as Delay Time and Delay Bake. Cook Time sets the cooking duration and turns the oven off when that duration ends on supported models. A separate kitchen timer is a reminder; do not assume it controls heating or shuts the oven off. Check your manual for the behavior of each control.
GE explains the difference in its Delay Start guidance. If automatic shutoff is your goal, make sure you have programmed Cook Time or the equivalent timed-bake feature for your model.
Before you start: check the clock and the food
Make sure the oven clock is correct, choose the recipe’s temperature, and decide when you want cooking to finish. Work backward to allow for heating and cooking. My video shows broccoli at 425°F; that is the setting in my demonstration, not a temperature recommendation for every dish.
Food safety matters: GE warns that easily spoiled foods, including milk, eggs, fish, stuffing, poultry, and pork, should not sit for more than one hour before or after cooking when using delayed cooking. Do not leave a turkey, ham, or egg-and-dairy dish waiting in a cold oven for hours. Follow your recipe, your model’s manual, and safe food-handling guidance. Automatic shutoff is not refrigerated storage or a keep-warm setting.
How I set Delay Start and Cook Time on my GE oven
- Set the delayed start time.
Use the Delay Start or Delay Time control and enter the time you want the oven to begin. Confirm it as prompted by your control panel. In the video, I set an evening start time so the broccoli can finish with the Instant Pot dish. - Select Bake and enter the temperature.
My oven prompts me to set Bake after entering the delay. I choose 425°F for the broccoli demonstration, then press Start. Use the temperature required for your recipe. - Enter Cook Time.
Set the duration you want the oven to run. I account for the oven heating up in my demonstration. Confirm the cooking duration with Start or the control required by your model. - Check the display before walking away.
On my oven, the display returns to the delay setting and shows when automatic cooking will begin. Verify the start time, cooking temperature, and duration—not just that a timer is counting down. - Check the food when cooking finishes.
Timed cooking ends the programmed cycle; it does not prove the food is done. Check doneness using the method appropriate to your dish and remove or store the food safely.
For other GE control panels, see GE’s Cook Time instructions. The sequence differs between number-pad, plus/minus, and touchscreen models.
Does Cook Time include preheating?
In my video, I deliberately allow for the time it takes my oven to heat. Check how your model counts Cook Time and whether your recipe requires a fully preheated oven before the food goes in. Do not add a fixed number of minutes to every recipe or assume that time spent heating equals time baking at the target temperature.
Planning Thanksgiving, Christmas, and Easter meals
I have noticed this tutorial gets renewed interest around Thanksgiving, Christmas, and Easter. Those are exactly the meals where coordinating a side dish with another appliance can help. My broccoli-and-Instant-Pot example shows the idea without requiring every dish to use the oven at once.
For a holiday meal, write down your serving time, each dish’s oven temperature, cooking time, and any resting time. Use delayed cooking only where the food and your model’s instructions make it appropriate. Keep perishable ingredients properly stored until it is safe to cook them. If the recipe needs a preheated oven or the food cannot safely wait, start cooking manually instead.
If your GE oven does not start or turn off as expected
It did not start: Recheck the oven clock and the programmed start time. Confirm that Bake and a temperature were entered and that you completed the required Start or confirmation steps. GE notes that controls without an AM/PM selection limit delayed starts to within 12 hours.
The program disappeared: GE says many models clear a program if you pause too long—generally about 30 seconds—after an initial Start or Cook Time entry. Re-enter the settings using your model’s instructions.
It did not shut off: Verify that you set Cook Time, not only Delay Start or the kitchen timer. If the controls still behave unexpectedly, consult your model’s troubleshooting section or contact GE support.
My takeaway
The useful part is understanding what each control does: Delay Start schedules the beginning, Bake sets the cooking mode and temperature, and Cook Time ends the timed cycle. Check the display, account for your recipe’s preheating needs, and keep food safety part of the plan.